Agnes Street Gardens
Gardening and growing since 1973
What a great idea! Wish I'd thought of that ...
Here is a collection of tips and advice from our garden information exchanges and links to helpful websites.
TOPICS
ANEMIC-LOOKING PLANTS
Back to top
Some gardeners have reported that their plants, especially beans, have rather pale to yellowish leaves after just emerging. It turns out that if Fall leaves spread on garden beds are not thoroughly dug in at the beginning of Spring, the beans (which have long roots) and other veggies will have a hard time getting enough nitrogen. This advice is from Borden Mercantile. They recommend blood meal, which has a very high nitrogen content, to give the plants a boost (it works).
BERRY PROTECTION FROM BIRDS
Back to top
As berry harvest season comes around, you may need to protect your berries from the ravenous birds (and other critters). Aside from the usual netting over the bushes here are a couple sites that might help:
BINDWEED
Back to top

Although it looks like lovely white Morning Glory, Bindweed is a highly invasive plant that will gradually take over your garden unless you deal with it quickly and thoroughly. As it grows, its roots grow down deep into the sub-soil and its vines weave around your delicate vegetables, slowly choking them out. Bindweed is extremely difficult to remove once the plant is fully grown because the deep roots also branch sideways, breaking off as you pull them out and starting plants from each side branch. Yes, it really is just like the sorcerer apprentice's enchanted broom, each piece becoming another whole plant. Add to that Bindweed's great ability to spread seed everywhere ... well, it truly is aiming to take over the world, or at least your garden!
Complete removal of fully grown Bindweed can take several years of persistent work. The best way to get rid of it is to cut it off at soil level and patrol carefully for baby plants as they sprout. Don't bother pulling it up; it will just re-sprout wherever you tore the roots. By continually cutting it off at ground level, you will eventually starve the plant (since it is unable to photosynthesize) and it will die.
A word of advice in Spring: if you have a lot of Bindweed in your garden, don't rototill unless you want to have twice as much Bindweed as you had before!
CLUBROOT
Back to top
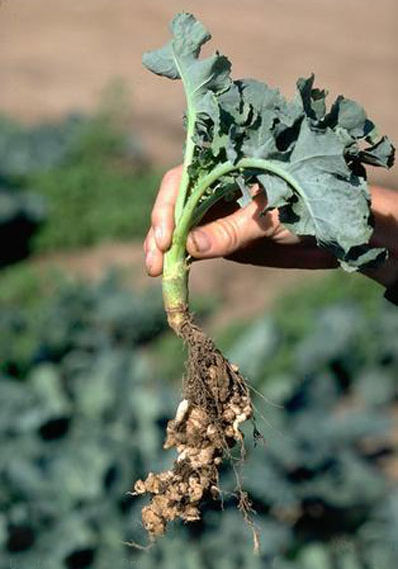
What is Clubroot?
- Clubroot is an infectious plant disease that affects members of the cabbage family, e.g. cabbage, broccoli, cauliflower, kale, Brussels sprouts, radishes, arugula, mustard, wallflowers, stocks, and cruciferous weeds. Cabbage, Chinese cabbage and Brussels sprouts are the most severely affected.
- The pathogen that causes clubroot is Plasmodiophora brassicae, and there are various strains of it.
- The name Clubroot comes from the characteristic galls produced on the roots of infected plants.
- Clubroot can be spread by infected plant parts and infested soil
Disease Development
- Clubroot is generally favoured by acidic soils so using lime or wood ashes can help.
- Abundant soil moisture is required for infection, especially early in season.
- It takes about six weeks from the time of infection to full-blown symptom development. Characteristic symptoms are wilted or stunted plants and multi-lobed root galls containing large quantities of resting spores.
- Resting spores may survive in soil for up to 20 years; however, their half-life is about 4 years.
Disease Spread
- Plasmodiophora brassicae is primarily a soil-borne plant pathogen.
- It can spread via movement of infested soil from farm machinery, vehicles, tools and footwear, soil erosion and water run-off.
- Infected vegetable transplants can also spread the clubroot pathogen. Capital City allotments were almost all infected from gifts of seedling brassicas from a generous member.
Best Management Practices
- Remove soil from tools and machinery prior to moving it out of infested plots. Hot water and bleach can clean tools and rototillers, however, this would be difficult to do at Agnes Street Gardens.
- Use long rotations between successive crops of brassicas.
- Use direct seeding or minimum tillage where possible.
- Plant clubroot-resistant vegetable varieties. West Coast Seeds sometimes sells resistant seeds: Rescue cabbage (10 seeds for $5) and Crispus brussels sprouts (10 seeds for $7.79).
- Some Agnes members grow crucifers in large bottomless plastic pots of good soil.
COMPOST
Back to top
David Stott, a fellow Agnes Street gardener, has considerable knowledge of composting. In a presentation on May 9/15, he discussed the basic components of compost:
- green matter - grass clippings, disease-free plants
- brown matter - leaves, straw
- and activators - manure, soil, seaweed
Coffee grounds are an excellent additive to a compost pile or box. Small amounts of shredded newspaper (no high-gloss paper) are fine as well. He does not recommend composting diseased plants or pet waste because smaller composting efforts cannot achieve high enough temperatures to kill all pathogens.
To build a compost pile, he recommends equal parts greens and browns plus an activator with ~6" of largish plant stems at the bottom of the compost pile to provide air circulation, which is critical for successful composting.
The Compost Education Centre website at http://compost.bc.ca has tons of information on composting. Click on LEARN > Factsheets. Compost bins + compost bin parts are available for sale at the Centre.
COUGARS
Back to top
Some years there are a few sightings of cougars in the region (some quite close to the Gardens). Gardeners are reminded to keep an eagle-eye out for these big cats especially if you garden early or late in the day. Here is an excellent B.C. site about cougars: Ministry of Environment, Cougars
COVER CROPS
Back to top
George (a long-time gardener and garden mentor on the east side) recommends planting buckwheat as a summer-early cover crop after some areas of your garden have been harvested. It's a quick-growing plant which should be dug under after flowering. The bees love this plant. Follow this up with hairy vetch and/or fall rye.
See these sites for more information:
DEER
Back to top
Deer are a regular pest that many Victoria gardeners have to cope with. So far Agnes Street Gardens have escaped a deer invasion. We suspect the dog walkers that routinely go through the gardens may scare off the deer because they do not like the scent of dogs. Long may that continue. Please report any sightings of deer or damage to any member of the executive.
GRASS CLIPPING MULCH
Back to top
A few gardeners have asked about grass clippings and how to use them. ASGA executive has arranged for some lawn service companies to drop off grass clippings. None of the grass clippings we get are from lawns that have had herbicides or pesticides applied on them.
A Google search for information on grass mulch suggests that on balance grass mulch is good for vegetable gardens with a few caveats: applied too thickly it can get slimy in wet weather, and too much nitrogen is added particularly if the gardener uses additional nitrogen amendments.
The advantages of using grass clippings are:
- They are a fantastic weed suppressant. Most gardeners don't relish hoeing and weeding their plots over and over again during the growing season. We've got better things to do!
- They help retain moisture so watering is kept to a minimum.
- They are a great compost for your garden.
- They are particularly effective when you use minimum tilth methods. Some Agnes gardeners only hoe and dig areas that will be planted with crops. I've subscribed to this method for the past 4 years with great success.
The disadvantages of using them are:
- They sometimes introduction weeds.
- They can add too much nitrogen to the soil.
- They can attract pests.
POTATOES: GROWING SUCCESSFULLY
Back to top
Here are some pointers for growing potatoes successfully at Agnes Street Gardens.
- It's probably best *not* to grow potatoes in raised beds. They need a continuous supply of water (~1" per week) and raised beds tend to dry out more quickly.
- Potatoes do not like lime, so when planning your garden for the following season, do not lime that area once you have harvested the crops.
- Spacing for potatoes that works well: 1 yard or a meter between rows, and 12" between potatoes in each row. Unless you love digging deep trenches, use lots of mulch (mainly grass clippings and leaves) to "hill up" the potatoes. I make the row 4-6" deep.
- I work in an organic fertilizer mix and green sand into the bottom of the row before planting the potatoes. I cover the potatoes with soil and tamp down. The fertilizer mix and green sand are available from Borden's -- where we get 10% off with our garden card. :-) Green sand is an ocean sediment that is high in iron, potassium and magnesium.
- Minimum temperature of the soil for planting: 6C (43F).
- Do NOT water until the potatoes start to emerge -- usually in a couple weeks. Keep water off the leaves when you do water. Do not overwater.
- It's important to water your potatoes during the flowering stage - that's when the potatoes start forming. I usually reduce the watering once the flowers have finished. Note: my plot tends to be on the wet side, so I probably don't water as much as other gardeners further up towards Agnes Street do.
- Let the foliage totally die down before harvesting (for potatoes you want for winter storage). Of course you can "fish" some potatoes out by hand beforehand -- that's always fun.
- By planting the seed potatoes relatively shallow and hilled up with some soil and mostly grass/leaves, I generally do not have to dig deeply to find potatoes.
- Potatoes can be hit by early and late blight (the late blight is more devastating than early blight). For that reason I usually purchase varieties that are mid-season and resistant to blight. So far I haven't had a problem.
- I always purchase organic seed potatoes -- usually from West Coast Seeds. Their catalogue has excellent growing instructions. Last year I grew "Orchestra" and "Satina" (on the advice of West Coast) because they were out of "Sieglinde", my preferred potato. "Orchestra" is an excellent storage potato and heavy producer. We're still having some of the "Orchestra" potatoes in February.
- West Coast Seeds advise that if your seed potatoes are sprouting too early before planting, leave the sprouts until it's time to plant. Do NOT remove. If the sprouts are long, cut back some at planting time. Those potatoes with longish sprouts should be planted deeper.
Source of information on potatoes, website of West Coast Seeds, Grow Guides: How to Grow Potatoes
Written by Barbara Irwin, Director of Special Events and Education, February 2017
POWDERY MILDEW
Back to top
From Wikipedia: "Powdery mildew is a fungal disease that affects a wide range of plants. Powdery mildew grows well in environments with high humidity. Infected plants display white powdery spots on the leaves and stems. As the disease progresses, the spots get larger and denser, and the mildew may spread up and down the length of the plant."
At one of our Garden Information Sessions, a gardener recommended a video on YouTube: search "Zero Blight Horsetail". Another gardener recommended the following formula found in ABCs of West Coast Gardening by Mary Palmer:
- 15 mL (1 tbsp) baking soda
- 5 mL (1 tsp) of vegetable oil
- 3 drops dish washing soap
Mixed ingredients into 4 litres of water. Spray weekly until the problem is resolved.
RATS IN COMPOST
Back to top
Not a nice subject, but these critters can do a lot of damage to our garden supplies, which are often stored in tool boxes, and our crops. Please report any sightings of rats (or damage) to any member of the Agnes Street Gardeners Association executive (ASGA).
Marika Smith, Executive Director of the Compost Education Education Centre, sent us this email about rats and compost bins.
"Rats are fairly active at this time of year and are generally looking for a safe, enclosed habitat to nest in away from hawks and other predators versus just looking for a food source. It is a common myth that composting alone attracts rodents as they already exist in our neighbourhoods and we actually hardly see them for how many there are!"
"Below are some best practice tips for rodent prevention:
- Buy or build a rodent resistant composter. When purchasing a composter, ensure that there are no
openings greater than
inch (0.64 cm). Check to see that it comes with a secure lid and base so that rodents cannot
tunnel under the bin.
The Compost Education Centre sells the Earth Machine, a composter made of durable recycled
plastic. It comes with a lockable
lid and a perforated plastic base plate which allows for drainage and "compost critter" access,
but blocks the entry of tunneling
rodents.
If you are making your own bin out of wood, line the sides and bottom with strong, inch (0.65 cm) wire mesh and put a solid lid on the top. The Compost Education Centre has free plans for the construction of a one or three bin composting system at their resource centre, 1216 North Park Street, Wed-Fri 10am-4pm.
- Locate your bin away from bird feeders and areas of rat refuge. Another easy way to deter rodents is to site your composting system in the open, away from what we call "rat refuge." Rats enjoy visiting bird feeders where they can get a quick meal. They also like hanging out around lumber piles, shrubbery, sheds and fences from which it is convenient to dart quickly to your composter. Instead of concealing your recycling system, celebrate it by putting it where you can see and appreciate it.
- Manage your bin appropriately. Rodents will be less interested in your compost if you don't cater to their feeding and nesting habits. They love bread and grains, greasy foods, or those containing animal products, such as meat, fish, or dairy products. They are less likely to be attracted to the premium compostables, which include fresh fruits, vegetables, coffee grounds, teabags and rinsed eggshells. Cover these kitchen wastes with a "brown" material such as leaves, straw or shredded newspaper, regularly aerate your pile, and keep it about as moist as a wrung-out sponge. An active pile makes an unwelcome home and also produces compost quickly and efficiently!"
Thank you, Marika!
RASPBERRY PROBLEMS
Back to top
The following tip is from Brian Minter, a B.C. Master Gardener expert:
"If you are having problems with your raspberries, there are two issues that should be checked.
- Wet feet - their roots do not like to be wet - root rot could be the problem
- Cane borers - look at the bottom of the canes to see if there are any lesions. If yes, cut out the canes. Any dead canes should be cut back and then feed the remaining good ones."
RHUBARB
Back to top
Here is a great site dedicated to all things rhubarb. It's a labour of love and truly amazing. Check it out: Rhubarb-Central
SWEET POTATOES
Back to top
A number of Agnes gardeners have successfully grown sweet potatoes. They are a little tricky however. Helen Chestnut gives excellent instructions on how to grow them in one of her recent columns in the Times-Colonist. See: Helen Chestnut, Times-Colonist, June 3/14
SYRPHID FLIES: THE APHID KILLER
Back to top

The syrphid fly (or hover fly) is a beneficial insect, consuming hundreds of aphids in its larval stage. They are commonly considered to be the most important aphid predator in vegetable crops. As adults, they are also important pollinators to a wide range of flowers.
The adult flies are usually yellow and black and resemble bees. However, unlike bees, they only have one set of wings. The eggs resemble a grain of rice and are often laid singly on leaves. The larvae are frequently confused with common caterpillar pests that feed on vegetable crops.
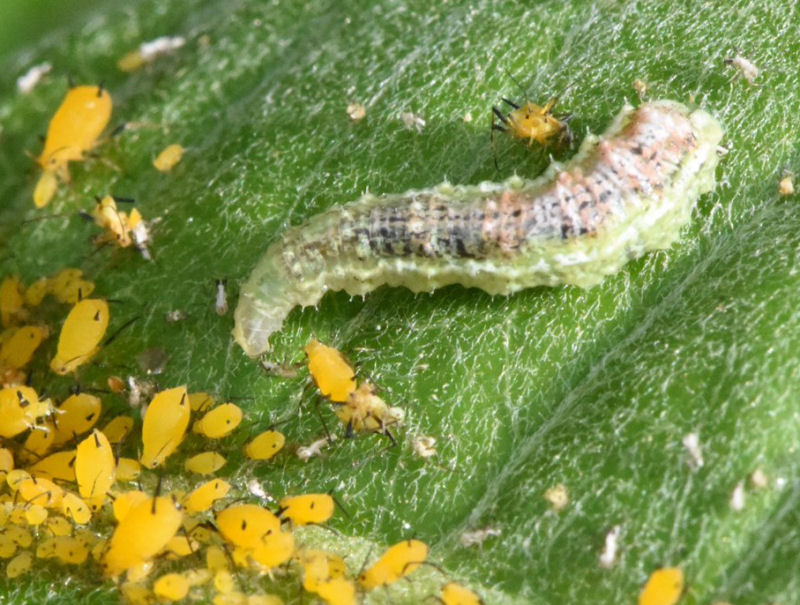
Being able to identify the syrphid fly larvae is crucial as you make decisions about pest management in your garden. Luckily, there are a few simple features that will allow you to distinguish between syrphid fly larvae and caterpillars. The first thing to look for is whether or not the insect has legs. Syrphid fly larvae do not have legs and move in an undulating manner. Caterpillars have legs. If you are unsure if an insect has legs, try getting it to move. The legs will be apparent on a moving caterpillar. Syrphid fly larvae have nondescript heads, no eyes, and no chewing mouthparts. Impressively, these blind legless larvae manage to consume entire aphid colonies!
You can make your garden more hospitable for syrphid flies by planting flowers that provide nectar for adult flies, such as sweet alyssum. For more information about the flies, you can start by watching this Washington State University video.
WEEDS IN WINTER
Back to top
During Winter, weeds can really take off in your garden. Chickweed and red dead nettle especially thrive and are lush, in full bloom, and ready to go to seed first thing in Spring. The best way to get rid of of unwanted weeds is to cover your plot with black plastic or landscape cloth. Cover the garden in early November or after you've finished your harvest and cleaned everything up in Fall. Our experience with this method is that it is extremely effective! It spells the end of unwanted weeds and saves a lot of back-breaking work.
Covering with a thick layer of mulched leaves Saanich brings to the Gardens every fall works a treat also. But just make sure to turn the leaves under early in Spring so they have a chance to break down before you plant (see comments under Anemic-Looking Plants).
WIREWORMS
Back to top
Wireworms are the larvae of click beetles and can be a serious problem. These beetles lay their eggs underground and hatch into wireworms, a short, thin gold-coloured worm which can decimate young transplants, especially lettuce. The beetles love grassy areas, particularly those spots that have just had sod turned, but the grassy walkways also provide an ideal venue. One solution which works well is to bury bait -- old potatoes skewered on a wood or metal stick. Every few days pull up the stick and dispatch the wire worms that have collected on the potato and replant the bait. This method works a treat.
Here's one website about organic wireworm control: Wiley Wireworms